
|
We are so pleased to have reached 12 years in business. The average quilt store has a twelve year life span..so we have been having a blast patting ourselves on the back for being above average. However, we really need to give credit to where it’s due. Because we would not be here without…help from our friends. Getting Started… We have told this story before, but it bears repeating. I had worked at another quilt store in Brownsville, that unhappily went out of business after three years. My two years stint there revealed a couple of important things. A. I love this business! B. Quilt Stores are expensive businesses to start and run. So, while I had always dreamed of being able to open one someday, I had kind of put that dream on the back burner for a “Some day when I retire” project. One day I’m walking down the street, saw one of my Brownsville Peeps, and made a gesture to an empty store front and said, “I think that would make a great Fabric Store” and sauntered on down my way. My husband had a job interview in Astoria later than week, and I went along for the ride. On the way up I said, “Let’s pray about this” and I prayed that IF he didn’t get the job, somehow the path would be cleared for us to open a quilt store in Brownsville. Two days after we found out he didn’t get the job, That same Brownsville Peep offered an unsolicited loan to help us get started. They wanted to see a store open for business in downtown Brownsville vs. the trend of offices and thought they should do something about it. Considering my recent prayer, I thought I would be an idiot to turn that down. So, we went with it! If any future quilt store owners are reading this, please be aware it has not been all sunshine and roses. Paying that loan back was incredibly hard work, and my recommendation would be to not start this kind of business with a loan if you can avoid it. But I didn’t know any better, and boy am I glad I didn’t! So, that’s day one of celebrating getting by …with help from our friends. A huge thank you to the anonymous friend who helped us get this going! SEW, now that you got stuck reading an unusually non sarcastic post from me, you can help us get our thirteen year celebration started! Day one: A lot of Cutting & One Little Block…Right now we have kits on sale in two stunning colorways to make this quilt. Mari's colorway is "War of 18TWELVE". Katie's colorway is "TWELFTH night". (we're having fun with the twelve puns...). The kits are currently on sale for $44.99, but only until Wednesday- so don't wait! (kits linked below.) Since this is a mystery quilt the images are blurred out- just to torment you guys :) This pattern is written to give you guys two sizes, kits are for the 48" versions, but if you want the bigger one- call the store! Fabrics needed. A: Background one: Mari is using a light background. Katie is using Black. B: Background two: Mari is using a "medium" background shade. Katie is using dark green. C: Background Three: Mari is using a "Dark" (aka tan) background. Katie is using green. D: Your color: Mari is using dark blue. Katie is using seafoam. E: Your other color: Mari is using a medium blue. Katie is using a slightly different seafoam. F:Your accent color: Mari is using red. Since Katie hates red, she's using white. 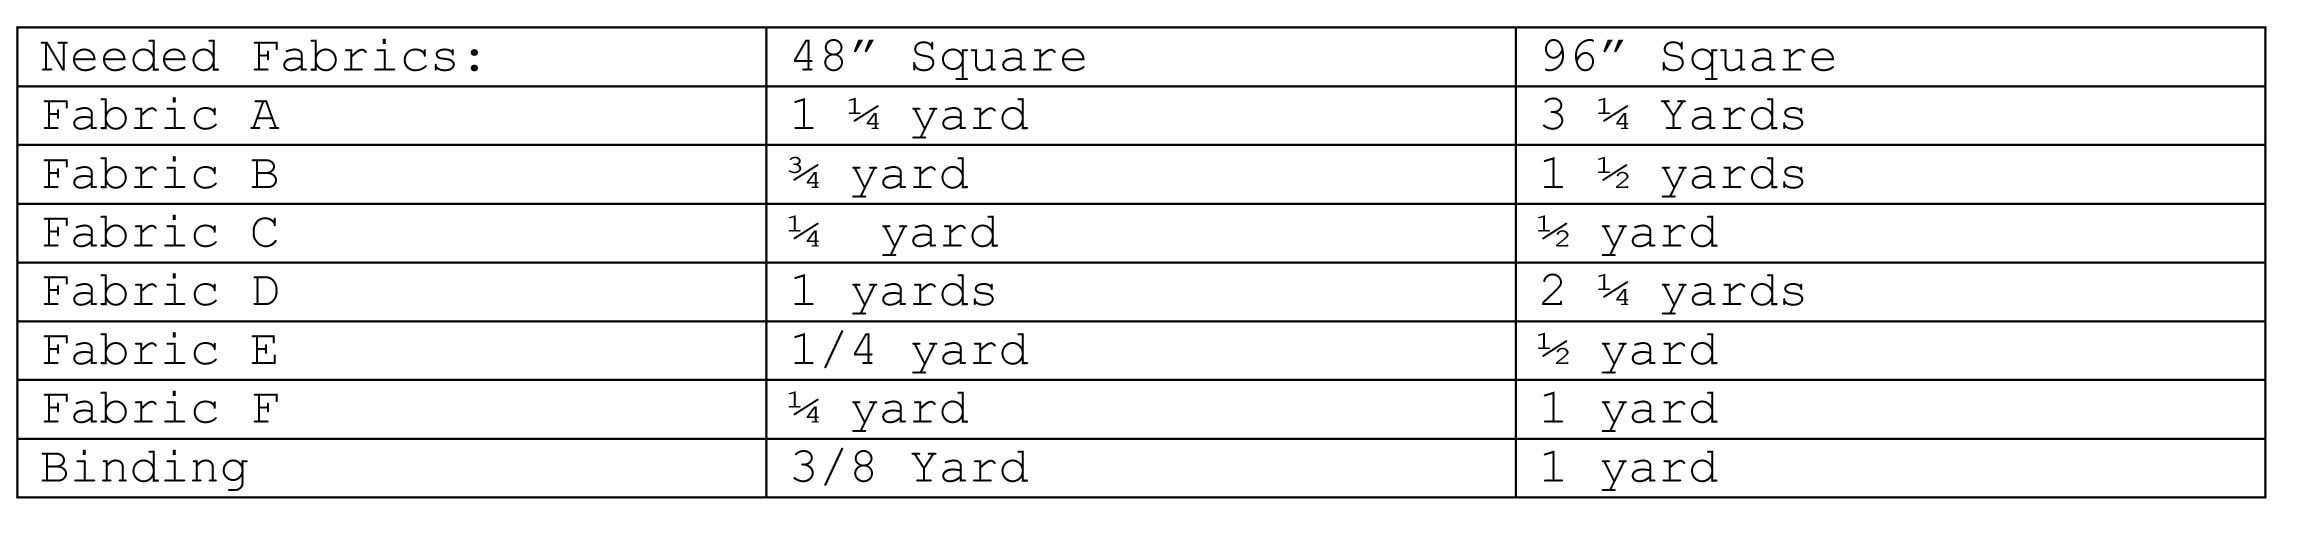 General Hints and Instructions: HST=Half Square Triangles. RST= Right Sides Together. On the topic of RST- always sew your fabric together that way unless specified otherwise. Always use a 1/4" seam allowance. Press to the dark side. If your spending too much time with jack the seam ripper- its time to take a break. Cutting for the 48" quiltFabric A: -Two 7” x W.O.F strips Sub-cut twelve 7” squares -Four 6 ½” x W.O.F strips From the first strip sub-cut three 6 ½” x 12 ½” rectangles From the second, sub-cut one rectangle and Four 6 1/2” Squares From the third strip cut six 6 ½” squares From the fourth strip cut four 6 ½” squares Fabric B: -Two 4” x W.O.F strips Strip one, cut four 4” x 7” rectangles, and two 4” squares. Strip two: Cut six 4” squares, for a total of eight 4” squares. -Two 3 ½” x W.O.F strips Sub-cut twenty 3 ½” squares Fabric C: -One 4” x W.O.F strip Sub-cut eight 4” squares Fabric D: -Two 7” x W.O.F strips Sub-cut eight 7” squares -One 4" x W.O.F. strip Sub-cut eight 4" squares -Three 3 1/2" x W.O.F. strips. sub-cut sixteen 3 1/2" squares. Fabric E: -One 4” x W.O.F Strip Sub-cut ten 4” squares Fabric F: -One 7” strip Sub-cut Four 7” squares, one 4 ¾” square Cutting for the 96" quiltFabric A: -Four 13 x W.O.F strips Sub-cut twelve 13” squares -One 24 ½” x W.O.F strips= Sub-cut three 12 ½” x 24 ½” strips -Two 12 ½” x W.O.F strip Cut one 12 ½” x 24 ½” rectangle, and four 12 ½” squares. Fabric B: -Three 7 x W.O.F strips Sub-cut four 7” x 13” rectangles and eight 7” squares -Four 6 ½” strips sub cut twenty 6 ½” squares Fabric C: -Two 7” x W.O.F strips Sub-cut Eight 7” squares Fabric D: -Three 13” x W.O.F strips Sub-cut Eight 13” squares -Two 7” x W.O.F strips Sub-cut Twelve 7” squares -Three 6 ½” strips Sub-cut sixteen 6 ½” squares Fabric E: -Two 7” x W.O.F strips Sub-cut Ten 7” squares Fabric F: -Two 13” x W.O.F strips Sub cut four 13” squares, and one 9” square. PiecingOne Little block: What your piecing: Flying geese- make four. You will be using…   Draw a line on the wrong side of the squares. Place one square, RST, on the left side of the rectangle. Sew On the line. Trim ¼” away, flip triangle back, and press. 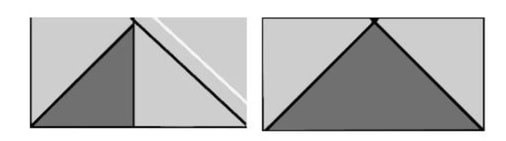 Repeat for the right side. Trim/Square to the following sizes.  Square on point:  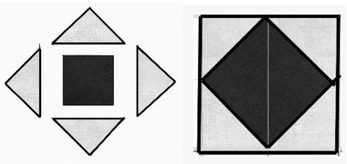 Take the squares from Fabric E, and cut them in half once diagonally (corner to corner) Sew a triangles to the top and bottom of the square from f. Press seams. Sew the other two triangles to the sides. Press seams. Trim/Square to the required following size.  Rows One & Three:   Grab two of the flying geese and sew the squares to each end. Press. They will finish at……..  Row Two:  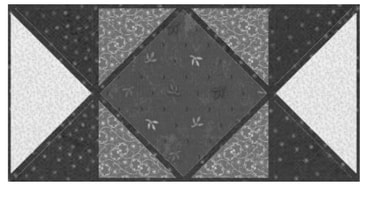 Sew the flying geese to each side of the square on point. Press seams. This unit finishes at……  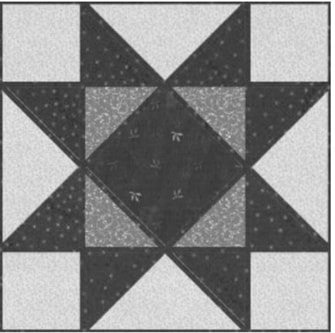 Star Assembly: Sew rows one and three to the top and bottom of row two. Press seams. They will finish at…. 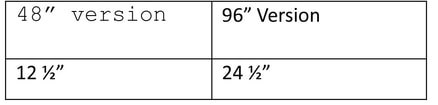 That's enough for today- go take a break and we'll give you the next step tomorrow!
0 Comments
Leave a Reply. |
AuthorMari is the owner (and Slave) of Yankee Dutch Quilting. She spends much of her time being bossed around by "Thing One" (her perfect eldest daughter), who may or may not also be her web editor. Archives
February 2024
Categories |
 RSS Feed